해커톤으로 배포까지 진행한 과정 중 팁 정리
Step 1: 프론트 기초 (index.html 작성)
* Code alignment in Visual Studio Code IDE *
- WIndows: [Alt + Shift + F]
- Mac: [Shift + Option + F]
- 둘 다 손가락 형태가 비슷하게 나온다. 까먹었으면 [오른쪽 클릭 > 문서 서식]의 단축키 참고.

* Import Google Fonts *
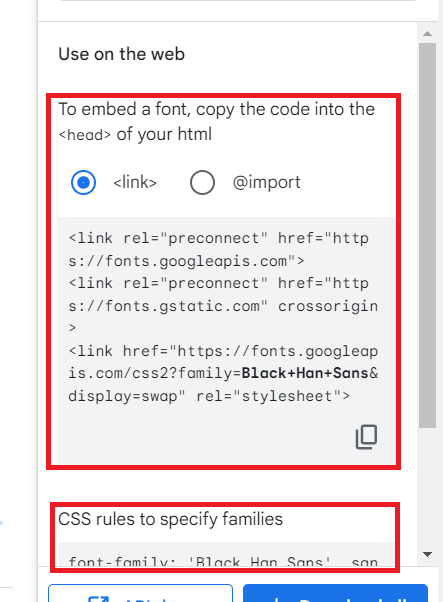
- Visit Browse Fonts - Google Fonts
- Choose a font style
- Follow the 'Use on the web' in the drawer box
* Background style setting *
background-color: url('');
background-position: center;
background-size: cover;
- 추가로 linear-gradient 메소드로 이미지에 그라데이션 효과 적용 가능. 본 과정에서는 이 기능으로 이미지를 어둡게 만들기만 했다.
- Reference: linear-gradient() - CSS: Cascading Style Sheets | MDN (mozilla.org)
* Make Image darker *
<style>
.img{ filter: brightness(0.5) }
div{ opacity: 0.5; }
.doo{ background-image: linear-gradient(rgba(0, 0, 0, 0.5), rgba(0, 0, 0, 0.5)), url(''); }
</style>
* Center alignment tag <div> itself *
<style>
div[id='headline'] { margin: 0 auto 0 auto; }
</style>
* Center alignment of child contents in <div> *
- display: flex;
- flex-direction: column;
- align-items: center;
- justify-content: center;
- CSS의 justify-content 속성은 flex container의 main-axis(수평축)을 기준으로 content item들 사이의 간격을 어떻게 배치할지를 정합니다. justify-content - CSS: Cascading Style Sheets | MDN (mozilla.org)
- CSS의 align-items 속성은 flex container의 cross-axis(수직축)을 기준으로 content item들을 어떻게 배치할지를 정합니다. align-items - CSS: Cascading Style Sheets | MDN (mozilla.org)
Step 2: JQuery Selector를 이용한 정적 웹페이지 구현
* Using JQuery *
- JavaScript를 이용한 DOM Tree 직접 제어 문법을 단순화
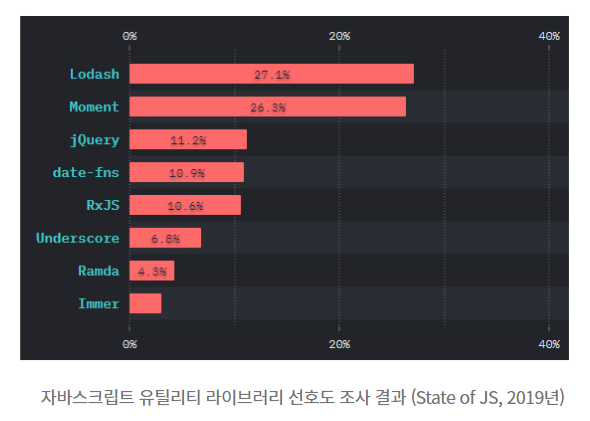
예전에는 인기가 많았으나, 최근에는 Lodash, Moment에 밀리는 추세
- CSS 선택자 엔진 Sizzle을 통해 손쉬운 엘리먼트 선택 가능
- JQuery.ajax() 메소드를 통한 API 접근성 등 인기가 많았음... BUT
- 웹 표준의 발전으로 querySelector, Fetch API 등장
- 개발이 편한 크롬 브라우저의 등장
- 최신 트렌드인 Interactive Web은 DOM을 직접 조작하는 옛날 방식으로는 렌더링 성능 구림.
- 대신, 메모리에 Virtual DOM을 구성하여 실제 돔과의 차이만을 반영하는 React, Vue.js 프레임워크 각광.
이러한 한계를 극복하고 경쟁력을 갖기 위해
- JavaScript 초경량 (매우 작은 용량) 라이브러리로 경쟁력 확보
- 방법 1: 최신 버전 브라우저만 지원
- 방법 2: Sizzle은 최소한의 필수 기능만
- 브라우저 호환 기능: 브라우저 의존적인 기능들을 상호 호환 가능하도록
결론: 정적이고 가벼운 웹페이지를 신속하게 제작하는 용도로 매우 적합하다.
* How to use JQuery Selector Sizzle *
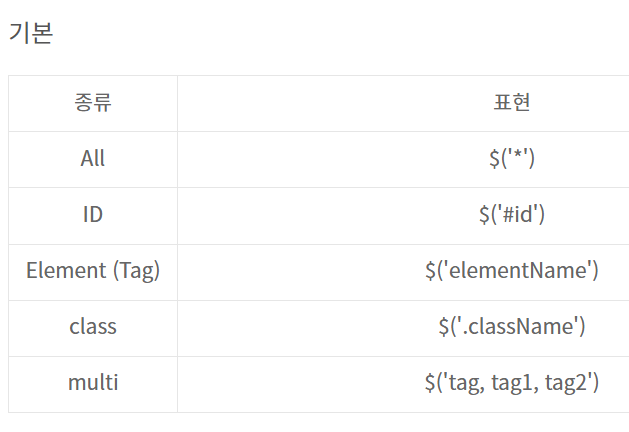
- All / ID / Tag / class / multi Selector
- : Filter Selector
- Attribute Contains Prefix Selector... 등
결론: 되게 많은데 그냥 querySelector(All)하고 regex를 익히는 게 훨씬 나음
Filter는 생각나면 나중에 써보기
Reference: 1. https://hello-bryan.tistory.com/241, 2. https://api.jquery.com/category/selectors/
Step 3: Web Scraping(Python), MongoDB(NoSQL)
* Web Scraping using library bs4 *
- URL을 매개변수로 BeautifulSoup 객체를 만드는 함수를 작성해봤다.
# init bs4
import requests
from bs4 import BeautifulSoup

def get_soup_by_url_from_bs4(url):
  headers = {'User-Agent' : 'Mozilla/5.0 (Windows NT 10.0; Win64; x64)AppleWebKit/537.36 (KHTML, like Gecko) Chrome/73.0.3683.86 Safari/537.36'}
  data = requests.get(url,headers=headers)
  return BeautifulSoup(data.text, 'html.parser')

soup = get_soup_by_url_from_bs4('https://bit.ly/42KfFIc')
* pprint *
- 리스트를 예쁘게 출력하기 위해 pprint(PrettyPrinter) 라이브러리를 사용했다.
# Pretty Printer
import pprint
pp = pprint.PrettyPrinter()
* MongoDB *
- DB명을 바탕으로 MongoClient 객체를 만드는 함수를 작성해봤다.
# init pymongo
import os
from dotenv import load_dotenv
from pymongo import MongoClient

def get_DB_by_DBname_from_pymongo(DBname):
    load_dotenv()
    root_id = os.environ.get('root_id')
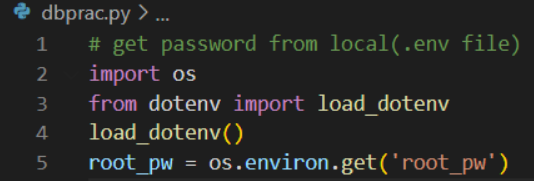
    root_pw = os.environ.get('root_pw')
    client = MongoClient(
        f"mongodb+srv://{root_id}:{root_pw}@my-mongo.fnaorrz.mongodb.net/?retryWrites=true&w=majority")
    return client[f"{DBname}"]

db = get_DB_by_DBname_from_pymongo('test')
? ? ? 과연 MongoDB는 어떤 방식으로 웹과 연동되는가 ? ? ?
MongoDB를 사용하면 웹에서도 연동이 되니, 결국 HTTP(S) request를 보낸다는 것인데... 어떤 방식으로 보내는지 이해가 가지 않는다.
대충 사용자 메모리에 적재해두고 백그라운드로 전송하는 방식인 것 같다. (https://ryu-e.tistory.com/2)

일단 localhost:27017로 보내는건가? 그럼 DB에 업데이트 쿼리를 전송하고, 통신을 어떻게 하는지 봐야겠다.


내부적으로 Query나 데이터를 TLSv1.2 프로토콜로 암호화하고, Mongo Wire Protocol로 미국 서버에 보내는 것 같다. 잘 받았다고 ACK 오면서 Data를 함께 보내는 건 DB의 무결성 검증을 위한 통신으로 유추되지만, document에서도 정확한 원리를 찾을 수 없었다.
(https://www.mongodb.com/docs/manual/reference/mongodb-wire-protocol/)
Wireshark를 통해 분석했고, TLSv1.2 프로토콜은 443번 포트에서 통신이 이루어지므로,
udp || tcp.port == 443 || tcp.port == 27017 를 필터로 잡고 분석하면 되겠지만 정보들이 암호화 되어 있어 볼 수 없다.
기술 매니저님께 여쭤보니, 하드 코딩 당연히 안 되고, 실무에서는 .env보다는 배포를 지원하는 플랫폼(Github, docker 등)에서의 내장 기능을 활용한다고 한다.
찾아보니 requests 모듈 내 HTTPS URL은 통신 간 자동적으로 암호화가 진행된다.

참고 링크
- MongoDB 개괄(https://kciter.so/posts/about-mongodb)
- DB 랭킹(https://db-engines.com/en/ranking)
Step 4: 프로젝트 수행 방식 정리
* 프로젝트 수행 절차 *
1. 프로젝트 정의: 어떤 기능을 수행하는지
2. API 설계: 기능 구현을 Server/Client의 콜백 관계로 표현
3. API 명세: (비동기적 구현을 가정하고) 각 콜백의 역할을 정의하고, 참조하는 데이터 명시
- 이벤트를 발생시키는 시점 (콜백 순서, 참조하는 데이터)
- 구현 간 디버깅을 위해 각 콜백은 jsonify된 msg 속성을 포함
- Return으로 결과를 받아와야 하는 경우, result 속성 포함
4. (필요하다면) 데이터 수집 또는 DB 연동: 활용할 수 있는 데이터 소스 준비하기
C > R > U > D ; meta tag(open graph) og:image / title / description
- 클라이언트 서버 연결 확인하기
1. Front: 진입점 확인 (상태 변화 유발 이벤트; 함수 등)
2. Request data form 만들기
3. Fetch로 백엔드에 전달 (전달 경로, method, data )
—
4. Back: 라우터에 의해 실행될 콜백 함수 정의
5. front에서 전달한 dataForm을 기반으로 정보 처리
6. json 형식으로 return
— 7. Front: break 또는 1로 순환
5. 기능 구현: 불확실한 부분(조각 기능) 먼저 시도하기
- 구현이 미숙한 부분부터 시도하여 변수 줄이기
- 통합 어플리케이션 작성 이전에 작은 모듈 단위로 검증 완료하기
6. 테스트 주도 개발 TDD
- 최대한 실행 가능한 상태로 유지하며 어플리케이션 개발
- 다양한 상수와 주석을 활용
- 정적인 상태로 동작하도록 구현
- 이후에 서로 다른 어플리케이션 간의 연결 (상수를 변수로 대체)
- Codecoverage: Unit jacoco Gradle ,Sonarqube using github
Step 5: Code Snippets
* Formdata *
- JQuery 대신 formData를 활용하여 폼에 포함된 모든 데이터를 손쉽게 submit 할 수 있음
https://ko.javascript.info/formdata
<form id="formElem">
<input type="text" name="name" value="Bora">
<input type="text" name="surname" value="Lee">
<input type="submit">
</form>
———————————————————————————————————————
* Initialize Flask Project *
1. File ‘app.py’ (entry point when using Flask with default settings)
2. Python -m venv (venv_name)
3. Folder ‘templates’
4. Pip install (libraryA) (libraryB) (…)
* Library 연동을 위한 삭제 및 설치 *
1. Pip freeze > requirements.txt
2. Pip uninstall -r <requirements.txt> -y : 기재된 라이브러리 모두 삭제 요청
3. Pip install -r <requirements.txt> : 기재된 라이브러리 모두 설치
pip install bs4 black flask pymongo python-dotenv requests
————————————————————————————————————
# init bs4
import requests
from bs4 import BeautifulSoup
def get_soup_by_url_from_bs4(url):
headers = {'User-Agent' : 'Mozilla/5.0 (Windows NT 10.0; Win64; x64)AppleWebKit/537.36 (KHTML, like Gecko) Chrome/73.0.3683.86 Safari/537.36'}
data = requests.get(url,headers=headers)
soup = BeautifulSoup(data.text, 'html.parser')
return soup
soup = get_soup_by_url_from_bs4('https://bit.ly/3ntpqKH')
—————————————————
trs = list(soup.select('#body-content > div.newest-list > div > table > tbody > tr'))
for tr in trs:
title = tr.select_one('a.title.ellipsis').text.strip()
artist = tr.select_one('a.artist.ellipsis').text.strip()
rank = tr.select_one('td.number').text.split()[0]
print(rank, title, artist)
————————————————————————————————————
Pymongo
# init pymongo
import os
from dotenv import load_dotenv
from pymongo import MongoClient
def get_DB_by_DBname_from_pymongo(DBname):
load_dotenv()
root_id = os.environ.get('root_id')
root_pw = os.environ.get('root_pw')
client = MongoClient(
f"mongodb+srv://{root_id}:{root_pw}@my-mongo.fnaorrz.mongodb.net/?retryWrites=true&w=majority")
return client[f"{DBname}"]
db = get_DB_by_DBname_from_pymongo('test')
————————————————————————————————————
JQuery
<script src="https://ajax.googleapis.com/ajax/libs/jquery/3.6.3/jquery.min.js"></script>
const target = $('#names-q' + 1)
————————————————————————————————————
- fetch를 비동기 방식으로 동작하도록 async-await 구문을 구사하거나, 하던대로 .then을 사용할 수 있다.
Fetch
fetch(URL)
.then(res => res.json())
.then(data => {
const target = $('#names-q' + 1)
target.empty()
data.RealtimeCityAir.row.forEach(row => {
const tag = `<li>${row.MSRSTE_NM} : ${row.IDEX_MVL}</li>`
target.append(tag)
});
})
Step 6: AWS EC2 Beanstalk 배포 실패 (망할 Windows)
Windows 환경에서 Git bash 내 명령만으로 AWS Beanstalk 배포하려다가 실패했다.
타협해서 AWS Beanstalk만 이용해보려고 처절하게 시도한 과정이다.
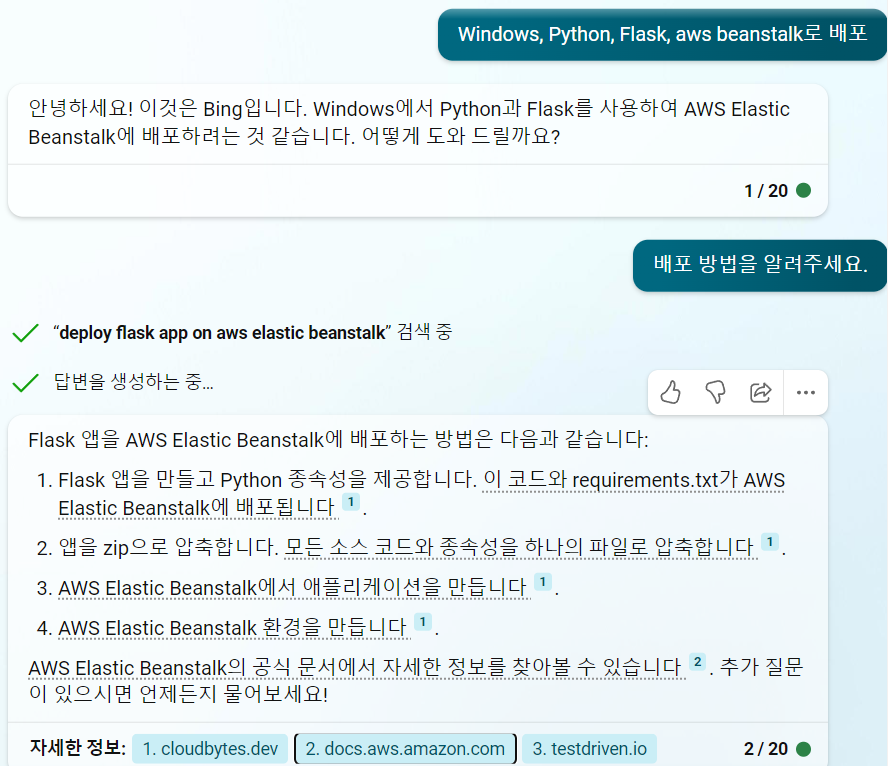
-
2번 링크 진입 Deploying a Flask application to Elastic Beanstalk - AWS Elastic Beanstalk (amazon.com)
-
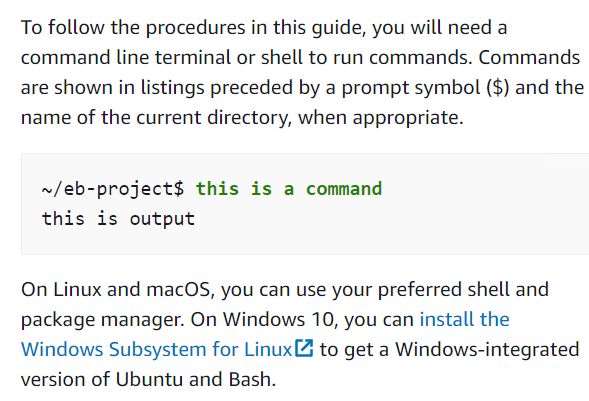
-
리눅스 호환성을 위한 하위 시스템 설치 Install WSL | Microsoft Learn
-
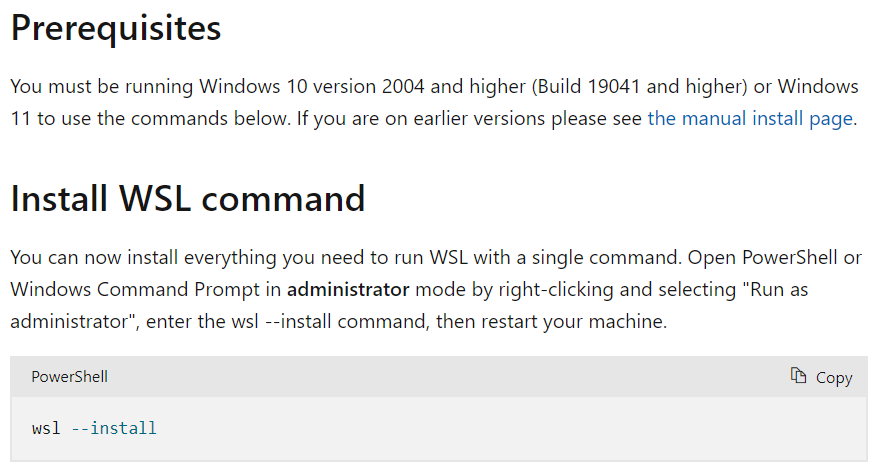

-
재부팅
-
Visual Studio Code > 작업 폴더 열기
터미널 > Ubuntu (WSL)

~/eb-flask$ virtualenv virt
** 만약 E: Unable to locate package python3-pip 오류가 발생한다면
- sudo add-apt-repository universe
- sudo apt-get update
- sudo apt-get install python3-pip
- virtualenv virt
~/eb-flask$ source virt/bin/activate
(virt)~/eb-flask$ pip install flask==2.0.3
(virt)~/eb-flask$ pip freeze > requirements.txt
eb-flask/application.py 생성 후 내용 작성
from flask import Flask

# print a nice greeting.
def say_hello(username = "World"):
  return '<p>Hello %s!</p>\n' % username

# some bits of text for the page.
header_text = '''
  <html>\n<head> <title>EB Flask Test</title> </head>\n<body>'''
instructions = '''
  <p><em>Hint</em>: This is a RESTful web service! Append a username
  to the URL (for example: <code>/Thelonious</code>) to say hello to
  someone specific.</p>\n'''
home_link = '<p><a href="/">Back</a></p>\n'
footer_text = '</body>\n</html>'

# EB looks for an 'application' callable by default.
application = Flask(__name__)

# add a rule for the index page.
application.add_url_rule('/', 'index', (lambda: header_text +
  say_hello() + instructions + footer_text))

# add a rule when the page is accessed with a name appended to the site
# URL.
application.add_url_rule('/<username>', 'hello', (lambda username:
  header_text + say_hello(username) + home_link + footer_text))

# run the app.
if __name__ == "__main__":
  # Setting debug to True enables debug output. This line should be
  # removed before deploying a production app.
  application.debug = True
  application.run()
-
(virt) ~/eb-flask$ python application.py
브라우저에서 http://localhost:5000/으로 접속 => 잘 실행됨
파일 구조는 다음과 같아야 한다.
-
~/eb-flask/
|-- virt
|-- application.py
`-- requirements.txt
/eb-flask/.ebignore 파일 작성
virt
-
EB CLI repository를 초기화하기 위해
우선 EB CLI를 설치해야 한다.
(https://docs.aws.amazon.com/ko_kr/elasticbeanstalk/latest/dg/eb-cli3-install.html#eb-cli3-install.scripts) -> https://github.com/aws/aws-elastic-beanstalk-cli-setup
- Git, Python, virtualenv가 필요하다.
- Python은 pyenv 라이브러리를 활용하여 버전 관리하기를 추천한다고 한다.
- pyenv를 다운로드 받으려면 Windows는 안 되고, 설정한 Ubuntu (WSL) 터미널에 homebrew가 필요하다.
-
Homebrew 설치
Ubuntu (WSL) 터미널로 들어가서 아래 명령어 실행
/bin/bash -c "$(curl -fsSL https://raw.githubusercontent.com/Homebrew/install/HEAD/install.sh)"
- Warning: /home/linuxbrew/.linuxbrew/bin is not in your PATH.
- 경고가 뜨는데 친절하게 다음 명령어를 가르쳐준다. 실행하기.
sudo apt-get install build-essential
brew install gcc
-
이제 pyenv 다운로드로 복귀한다.
Ubuntu 환경에서의 pyenv 다운로드 (https://wikidocs.net/10936)
-
sudo apt-get install curl
curl -L https://raw.githubusercontent.com/pyenv/pyenv-installer/master/bin/pyenv-installer | bash
-
이제 다시 EB CLI 설치로 돌아가자.
근데 가상 환경에서는 명령을 실행할 수 없다.
따라서 Windows '명령 프롬프트' 또는 'Powershell' 실행 이후
pip install virtualenv
만약 안 된다면 Python 환경 변수 설정을 해주어야 한다. 성공하면 아래 명령을 실행한다.
git clone https://github.com/aws/aws-elastic-beanstalk-cli-setup.git
python .\aws-elastic-beanstalk-cli-setup\scripts\ebcli_installer.py
설치가 완료되면, 자신의 명령 실행 환경에 따라 안내에 따라 'eb'를 환경변수로 추가한다.
1. CMD Prompt:
        cmd.exe /c "C:\Users\sean0\.ebcli-virtual-env\executables\path_exporter.bat"

2. PowerShell:
        & "C:\Users\sean0\.ebcli-virtual-env\executables\path_exporter.vbs"
Additionally, you would need to **restart this shell**
쉘은 재시작해야 한다.
-
이제 EB CLI repository를 초기화해야 한다.
eb init -p python-3.7 flask-tutorial --region us-east-2
(필요하다면 python 버전, 이름, 지역을 수정할 수 있다. )

이후 eb init을 다시 명령하면 설정을 진행할 수 있다. (선택적으로)
-
... 뭔가 잘못됐다. eb create에 대한 권한이 없다고 한다. 그리고 설치 환경이 자꾸 변경되는 것도 이상하다.
서버 내부 로그를 살펴보니 그냥 pywin32==(version)을 설치를 못하는거다.
OS에 따른 호환성 문제
Step 7: AWS EC2 배포 성공
Filezilla 활용해서 고정 아이피로 80 포트까지 개방하여 배포했다.
나중에 URL로 접속할 수 있도록 검색해서 시도해봐야겠다.
'Tip' 카테고리의 다른 글
| [MySQL] Workbench LOAD DATA LOCAL INFILE ERROR (0) | 2023.05.31 |
|---|---|
| [Java] Stream to List (0) | 2023.04.12 |
| [Visual Studio] Error Code: LNK1168 Tip (0) | 2022.11.16 |
| [Java GUI Design- Eclipse] Using WindowBuilder Plug-in (0) | 2022.11.01 |
| Github Desktop Commit & Fetch (0) | 2022.10.13 |